
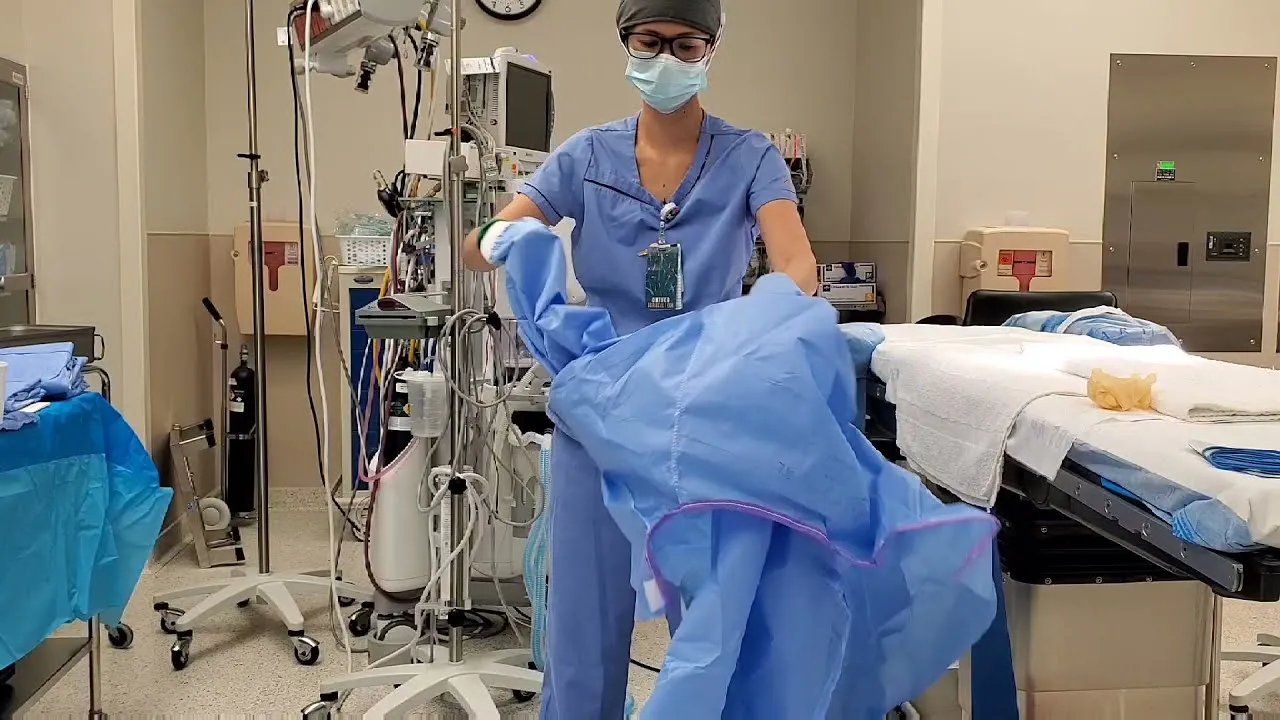
It can be hard to take off a surgical gown without touching the dirty outside. If you make a mistake, germs can spread and make you or others sick. This guide will show you how to remove a surgical gown safely, step by step, so you can stay clean and protect everyone around you.
Why Safe Surgical Gown Removal Matters?
Wrong surgical gown removal can cause self-contamination. It spreads germs to the environment. Studies show self-contamination rates between 30% and 50% when proper PPE removal techniques are not used. Contaminants can splash onto hands, shoes, and nearby patients. This happens most with non-absorbent gowns or when you remove the gown too fast.
Key Risks During Surgical Gown Removal
Self-Contamination: I’ve seen how rushing or skipping removal steps increases risk. Missing steps like unfastening ties last creates problems. Research with fluorescent tracers found contamination on hands, wrists, neck, and clothes. This occurs when people ignore the CDC technique.
Environmental Spread: Removing surgical gowns without the right sequence splashes germs. They land on floors, equipment, and people nearby. Simulated studies show careless removal propels droplets in all directions.
Gown Material Impact: Woven cotton gowns absorb more contaminants. This limits splash. Non-woven (plastic) gowns may increase droplet spread during removal.
Institutional and Infection Control Standards
- CDC Guidelines: The CDC protocol stresses unfastening ties first. You must peel the surgical gown away from your body. Minimize air disturbance.
- Compliance: OSHA and The Joint Commission require strict adherence to regulated gown removal steps. Breaking protocols can lead to institutional penalties. It puts patient safety at risk.
- SSI Connection: Mistakes in PPE removal contribute to surgical site infections (SSIs). These represent up to 22% of all healthcare-associated infections.
I recommend strict compliance and regular training. These prevent cross-contamination. They uphold infection control standards.
Preparation and Safety Measures for Surgical Gown Removal
Before you remove a surgical gown, prepare the environment well. This is critical for infection control. Start with hand hygiene. I recommend using alcohol-based hand sanitizer or EPA-approved disinfectant wipes. Allow the full contact time the product requires. This step prevents self-contamination before you touch the gown.
Next, remove gloves first. This cuts the risk of moving germs from the gown to the hands. For detailed steps, check an internal glove removal guide. Always inspect the gown for visible soil, moisture, or tears. If you see contamination, plan your removal to contain and reduce risk.
Designated Doffing Area and Doffing Methods
Choose a designated doffing area away from clean items. Use a marked “dirty” zone. Cross-contamination rates go up in shared or mixed spaces.
Decide if surgical gown removal will be solo or assisted. Tie-back gowns need an assistant. Disposable isolation gowns can be removed alone. Touch the inside of the gown only.
Doffing Preparation Checklist
- Remove hand and wrist jewelry
- Make sure gown sleeves are 2–3 inches above the elbows
- Check PPE integrity and expiration
- Set out gown and gloves on a clean surface
- Prepare a dedicated infectious waste bin
- Position hand hygiene products nearby
Critical Contamination Data and Workflow Example
Poor technique leads to hand contamination in up to 37% of gown removals.
As much as 80% of the gown surface germs concentrate on the front and sleeves.
Example: In some ORs, colored floor markings show safe doffing zones. Teams announce if they need help. PPE packs feature step-by-step checklists.
How to Remove a Surgical Gown Without Contamination?
I recommend following this safe surgical gown removal sequence. It minimizes infection and protects you and others. The process is quick. It takes under 60 seconds with practice.
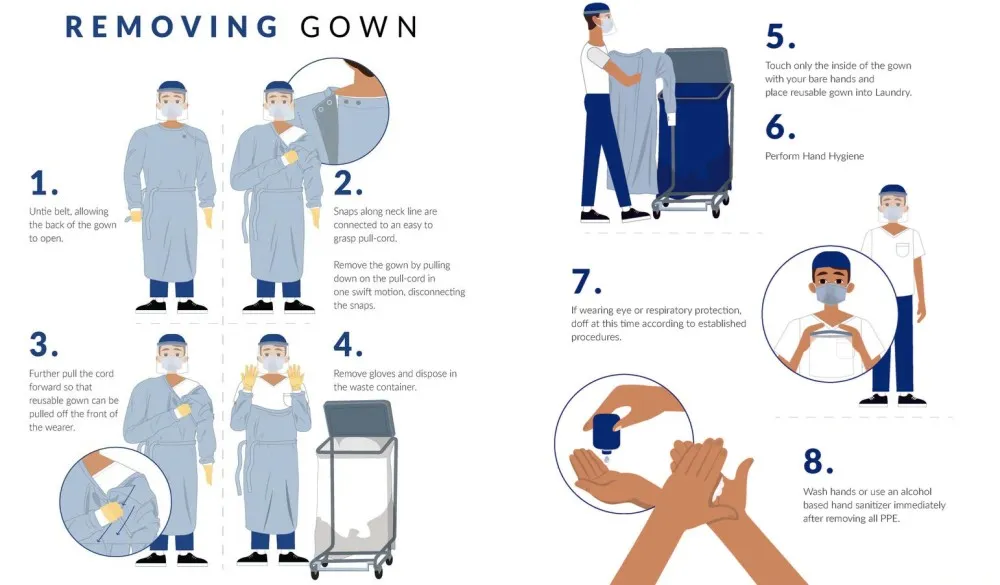
1. Enter the Designated Doffing Zone
Stay in the marked doffing area. Face away from all clean and sterile surfaces.
⛔ Never remove your surgical gown outside this area.
Time: 5 seconds
2. Untie the Neck—Touch Clean Inner Surface First
Untie the neck ties first. Use your clean fingers. Avoid reaching over your head.
– If ties are stuck, break them at the waist with gloved hands.
⛔ Contaminated hands can spread germs if touching clean areas.
Time: 10 seconds
3. Release Waist Ties and Roll Shoulders Forward
Release or untie waist ties. Roll your shoulders forward.
– If ties are wet or cannot be untied, snap or tear them at the waist.
⛔ Never pull the gown over your head.
Time: 8 seconds
4. Peel Sleeves—Turn Gown Inside-Out
Grasp at the shoulders or upper chest. Peel the sleeves down. Turn the surgical gown inside out. This contains contaminants.
– If sleeves stick, pull outward and down.
⛔ Treat all outer surfaces as contaminated.
Time: 8 seconds
5. Slide Arms Out One at a Time
Remove one arm at a time. Keep your hands covered by the inverted sleeves.
⛔ Do not let bare skin contact the gown’s outer surface.
Time: 6 seconds
6. Roll Down Surgical Gown—Soiled Surface Folded In
Roll the surgical gown downward from the shoulders to the cuffs. Fold the contaminated side inward. Bundle it tight.
– Secure the gown’s own ties.
⛔ Bad folding can release germs into the environment.
Time: 8 seconds
7. Dispose of the Surgical Gown Right Away
Drop the bundled gown straight into a biohazard waste bin.
⛔ Never place the gown on clean or shared surfaces.
Time: 5 seconds
8. Remove Gloves (if not done first)
I suggest using the glove-to-glove, then skin-to-skin method:
– Peel off the first glove with the gloved hand. Hold it.
– Slide a clean finger under the other glove’s cuff. Peel off and discard.
Time: 5 seconds
9. Perform Hand Hygiene
Clean your hands with soap and water for at least 20 seconds. Or use an alcohol-based sanitizer.
⛔ Delayed hand cleaning increases infection risk.
– CDC data: Hand hygiene after doffing lowers contamination to less than 0.5%.
Key Data & Tips:
– Correct removal sequence cuts contamination risk by 80–90%.
– Removing gowns or gloves the wrong way raises your exposure risk by up to 15 times.
– Visual guides or printed protocols can reduce removal errors by up to 40%.
– Based on my experience, CDC and AORN recommend bundling glove removal and gown doffing. This shortens exposure time.
Troubleshooting:
– If ties are stuck, break at the waist with gloved hands.
– For wet or bloody gowns, use extra care. Seek help if needed.
– Stubborn sleeves? Pull outward and downward. Be careful not to brush against your skin.
Tip: Print or bookmark this step-by-step guide. Use it in your surgical team’s sterile areas. I like that standard doffing cuts protocol errors and cross-contamination.
Using Visual Guides and Training Tools for Safe Gown Removal
I recommend using CDC-approved visual guides, video tutorials, and checklists. They improve safe surgical gown removal. They also reduce self-contamination risks.
CDC Infographics and Step-by-Step Posters
The CDC provides free, printable infographics. One example is the “Sequence for Putting on Personal Protective Equipment (PPE)” poster.
These posters include clear, high-resolution illustrations. They highlight key points: the gown front and sleeves are contaminated. Removal requires unfastening ties and peeling the gown off with care. Turn it inside out.
You can download PDFs from the CDC website. Print them or place them in workstations and training areas.
Video Guides for Correct Surgical Gown Removal
Official YouTube instructional videos show surgical gown removal in real clinical settings.
The video “Donning and Doffing PPE in Clinical Laboratories: Removing Gown” provides a clear, timestamped demonstration. Start at [2:45] for the relevant section.
These videos stress proper unfastening. Use a peeling motion. Turn the gown inside out to contain contaminants.
Practical Training: Mirror and Buddy-System Drills
I suggest using mirror-based practice or buddy-system drills during PPE training. CDC and studies recommend this approach.
Use a mirror or have a trained partner supervise you (the “buddy system”). This reduces doffing errors by up to 80%. It provides instant feedback and corrects habits.
Facilities that apply regular buddy-system training plus checklists see results. They experience a reduction in exposure incidents of up to 83% within six months.
Importance of Printable Checklists and Posters
Printable checklists and CDC training posters reinforce every step of safe gown removal.
You can post these materials at gowning stations. You can also include them in staff kits.
Clinics that display checklists see higher adherence rates. Staff spend more time on correct removal.
The CDC reports its gown doffing infographics are downloaded over 100,000 times a year. This reflects their value in practical training.
Key Data and Examples
Gown removal mistakes account for up to 30% of PPE-related contamination events.
Visual aids like posters and videos can reduce these errors by over 50%.
Over five CDC printable posters and three official video guides are free to use for clinical training.
Tip: I like to keep updated checklists and visual reminders posted in all doffing areas for immediate reference. Based on my experience, mirror practice and buddy-system drills should be part of regular PPE training. This delivers the best results and lowers exposure risks.
Common Mistakes and How to Avoid Errors in Surgical Gown Removal
Errors during surgical gown removal increase the risk of contamination. Healthcare workers and patients face this danger. I recommend learning the most frequent mistakes. Real-world data shows practical fixes for error-free, safe surgical gown removal.
Frequent Mistakes During Surgical Gown Doffing
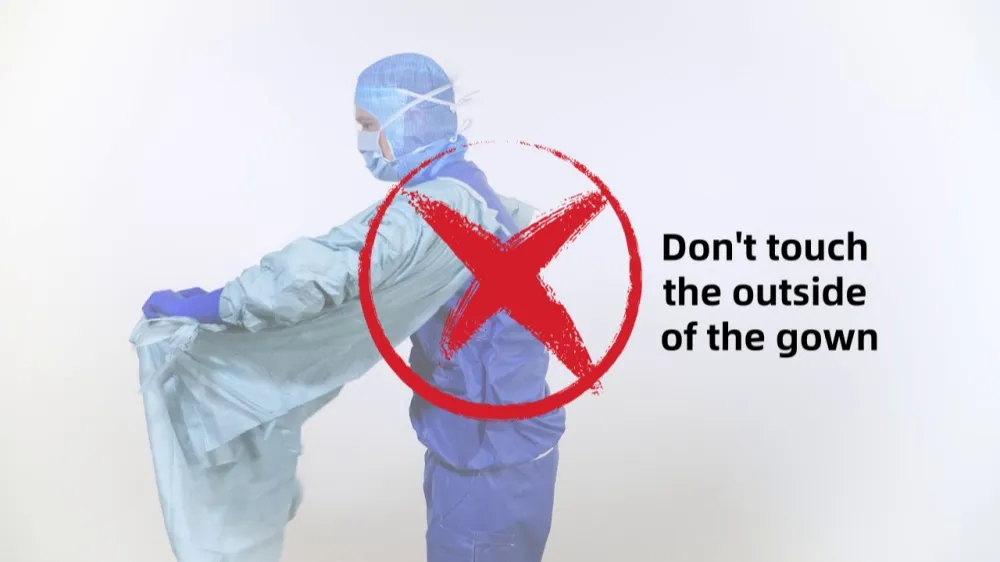
Touching the Outer Surface of the Gown
Many healthcare workers make mistakes when taking off surgical gowns . One big mistake is touching the outside of the gown. About 58% grab it from the front, which spreads germs. To fix this, go slow and peel the gown inside-out. Start at the shoulders and never touch the outside. Studies show that using the CDC method lowers contamination to 13%, but bad methods cause 70% contamination.
Rushing, Skipping Steps, or Incorrect Sequence
Another mistake is rushing, skipping steps, or doing them in the wrong order. Only 43% follow the correct PPE removal order, and just 13% do it carefully. About 57% take off the gown before the gloves, which is wrong. To fix this, say each step out loud while practicing. Learn the exact order and make it a habit.
Improper Disposal Outside Isolation Area
Workers also remove PPE outside the safe area too often. Around 40% do this, which can spread germs farther. Only 17% remove and throw away PPE inside the patient room, which is correct. To fix this, use color-coded bins right where you remove the gown. Put up clear signs and throw them away immediately.
Not Untying or Unfastening Before Removal
Half the staff forget to untie their neck ties first. This causes extra movement and more risk. Some even pull the gown over their heads, which is very dangerous. To fix this, always untie everything first. Then roll the gown inside-out from the shoulders down, slowly and carefully.
Touching Face, Neck, or Uniform During Doffing
Touching the face, neck, or uniform is another common error. About 39% of mistakes happen this way and spread germs to the hands or clothes. To fix this, watch your hands closely. Never touch your face, neck, or scrubs. Wash your hands right after removing the gown. This step is very important.
Using Ill-Fitting Gowns
Finally, using gowns that do not fit well causes more errors. Tight or loose gowns make removal harder and riskier. To fix this, pick a gown that fits snugly but is comfortable. A good fit makes doffing safer and easier.
Key Data and Real-World Example
- In a group of 30 observed HCWs, 4 followed all CDC recommendations for PPE removal.
- In high-risk environments, 36% of HCWs were contaminated after gown removal.
- Glove-first removal increased errors. This yielded a 72% error rate. It caused greater hand contamination.
Tip: I recommend regular training with spoken sequences and visible protocols. This improves compliance. It makes safe surgical gown removal second nature.
Special Considerations: Removing Different Types of Surgical Gowns and PPE
Each type of surgical gown and protective clothing needs its own removal method. This helps control infection and prevents self-contamination. I’ll show you how to remove disposable, reusable, and specialty garments in the operating room.
Different surgical gowns and PPE need slightly different handling. Follow the standard step-by-step removal sequence, but pay attention to these special points for each type:
1. How to Remove Disposable Level 3/4 Surgical Gowns?
Often have peel-away tabs or adhesive strips at the shoulders or back.
Peel the gown from the neck and shoulders, keeping hands on the inside surfaces only.
You can remove gloves together with the gown to save time and reduce contamination.
Dispose of the gown immediately in a biohazard bin—never place it on clean surfaces.
2. How to Remove Reusable Cloth Surgical Gowns?
Remove the gown carefully using the same standard sequence: inside-out, sleeves inverted, hands protected.
After removal, place the gown immediately into a leak-proof laundry bag.
Wash at 160°F (71°C) with EPA-approved detergent.
Inspect for tears or worn material; reusable gowns generally last about 75 wash cycles.
Store clean gowns in a dry, sterile area ready for next use.
3. How to Remove Coveralls or PPE with Integrated Hoods?
Start by unzipping completely and rolling the coverall down from the shoulders.
Remove the hood or helmet last.
Keep hands on the clean inner surfaces only; avoid touching contaminated outer surfaces.
If boot covers are used, remove them while seated, and clean shoes with approved disinfectant wipes.
For complex PPE, consider a trained assistant or buddy to reduce mistakes.
Tip: For all gown types, the main removal sequence stays the same. The key is handling the inside surfaces only, rolling contaminated surfaces inward, and following proper disposal or laundering steps.
Safe Steps for Removing Surgical Gowns with Help
You must remove reusable or disposable surgical gowns the right way. This stops you from contaminating yourself. It also limits infection spread. I recommend you follow the correct removal sequence. Use an assistant or trained observer protocol when you can. This cuts down errors.
Correct Order of PPE Removal
- Gloves: Remove gloves first. They are the most contaminated item.
- Gown: Untie and remove the gown next. Touch the inside parts. Turn it inside out as you take it off.
- Goggles or face shield: Remove these once gloves and gown are off.
- Mask or respirator: Remove this last. If airborne precautions are in place, wait until you leave the patient care area.
The CDC supports this order. It limits contamination risks at each step. Studies show that wrong sequencing causes problems. Touching contaminated gown surfaces causes up to 38% of doffing errors. This leads to more self-contamination.
Hand Hygiene at Every Step
The outer surface of the gown is contaminated. Treat it that way.
Did you touch the front of the gown during removal? Wash your hands right away. Use soap and water or an alcohol-based sanitizer.
Training modules say you need at least 30 seconds of hand washing after any exposure. I suggest you follow this.
Clean your hands before and after removing each piece of PPE.
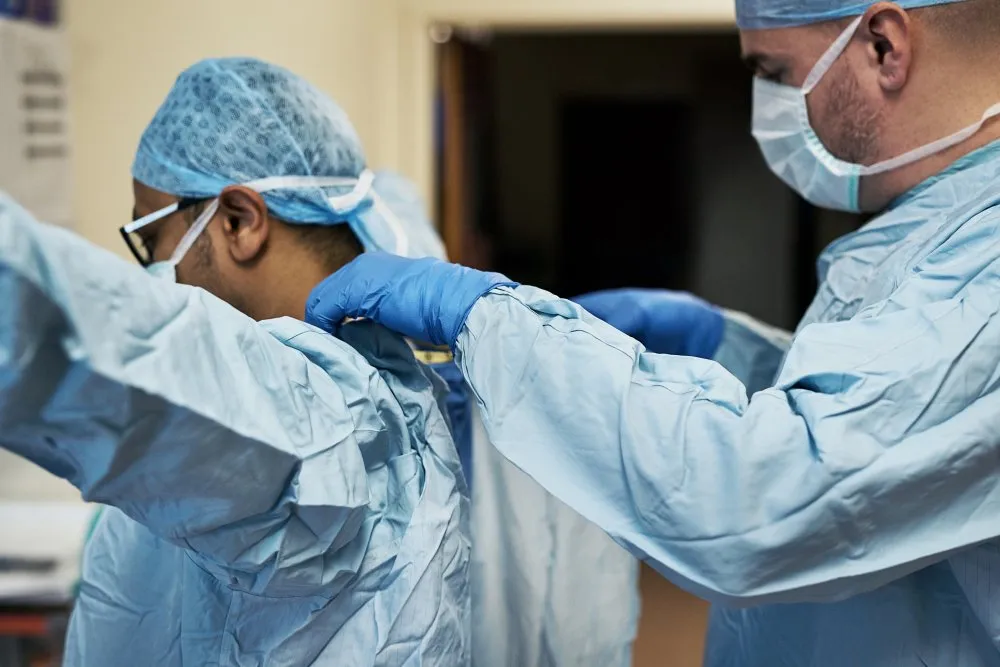
Using an Assistant or Trained Observer
A trained assistant helps cut surgical errors down. This is true in the operating room.
- The assistant should touch the back or inside of the gown. Never the outer surface.
- They must wash their hands before and after helping. They must also wash right after glove removal.
Studies show that a trained observer or assistant helps a lot. Doffing errors decrease by over 50% in test scenarios.
The observer reinforces strict protocol. This matters during outbreaks or hard cases.
Glove and Surgical Gown Removal Together
I recommend this method for safety and speed:
– Grasp the surgical gown at the shoulders.
– Pull forward and down. Roll the gown inside out.
– Peel off gloves at the same time as the gown. You contact the inside surfaces.
– Discard the bundle right away in a waste container.
– Do not shake the gown. This can spread contaminants through the air. It raises exposure risk.
More Protocol Steps
Remove PPE in the designated area.
Dispose of all used items in proper containers. Follow your institutional policy.
Report any exposure to your supervisor right away.
Practical Data and Key Facts
- CDC guidelines state: “Gown front and sleeves…are contaminated!”
- Never touch your face, mask, or respirator with contaminated hands or gloves.
- Ill-fitting gowns put you at risk. Skipping hand hygiene steps does too. Both healthcare workers and patients suffer.
- A trained assistant or “buddy” makes a big difference. Error rates and contamination incidents drop when they are present.
I believe you should follow these proven protocols. Make removal sequence your priority. Practice hand hygiene at every step. Use a trained assistant when you can. Based on my experience, this approach cuts cross-contamination risk in surgical settings.
Conclusion
Safe surgical gown removal stops germs and keeps everyone healthy. The wrong ways spread dirt and cause sickness. Use simple CDC rules, training, pictures, and a buddy to avoid mistakes. Good practice cuts risks by up to 90% and makes work safer. Stay careful—easy habits save lives!
Need custom one-time-use surgical gowns? Contact us for a free quote.