

It’s easy to worry about doing something wrong while dressing for a procedure, especially when every small step matters. This article, How to put on a surgical gown step by step, shows you a clean and simple method. You’ll quickly understand where to hold, how to move, and how to stay safe. The purpose is to make the whole process calm and smooth.
Pre-Gowning Preparation and Sterile Field Setup
Before you put on a surgical gown, I recommend following a strict pre-gowning preparation checklist. This maintains sterility and keeps patients safe:
- Inspect surgical gown packaging: Check that the packaging is sealed and intact. Gowns with holes, tears, stains, or broken seals should never be used.
- Prepare a clean, disinfected workspace: Place the sterile surgical gown package on a flat, clean, and disinfected surface. Never place it near high-traffic zones or areas that may be contaminated. Keep spaces clear of dust, stains, or debris.
- Tie back or cover hair: Cover all head and facial hair, including beards. Exposed hair causes contamination. Based on my experience, it’s a source for up to 50% of infections during surgical procedures.
- Confirm availability and sizes of gowning supplies: Lay out all needed sterile gowns and PPE items first. I recommend double-checking that each item fits. Make sure there are no defects.
How to Put On a Surgical Gown?
Putting on a surgical gown is important in hospitals and operating rooms. It helps keep things clean and stops germs from spreading. This guide will explain each step in detail. We will use simple words so it’s easy to understand, like for an 8th grader. Follow these steps carefully to stay safe and do it right. Remember, always wash your hands first and get help if needed. Now, let’s go through each step one by one.
Step 1: Perform Surgical Hand Hygiene
The first step is to clean your hands really well. This is called surgical hand hygiene. Why is it so important? Because your hands touch many things, they can carry germs that might make patients sick during surgery. If you skip this, you could spread infections, which is bad for everyone.
To do this, start by taking off any jewelry like rings or watches. They can hide dirt. Then, stand at a sink with running water. Use a special soap made for surgery, not regular soap. Wet your hands and arms up to your elbows with warm water. Put the soap on your hands and rub them together. Make sure to clean between your fingers, under your nails, and up your arms.
Rub for at least two to three minutes. Use a brush if you have one to scrub your nails gently. Rinse everything off with water, starting from your fingertips and going up to your elbows. This way, the dirty water flows away from your clean hands. Don’t touch the faucet with your hands after; use your elbow or a towel.
Dry your hands with a sterile towel. Pat them dry, don’t rub hard. Start from your hands and go up to your elbows again. Throw the towel away in the right bin. Now your hands are super clean and ready for the surgical gown. This step takes time, but it’s worth it to keep things safe. If you make a mistake, like touching something dirty, start over. Practice this at home with regular soap to get good at it.
Step 2: Open the Surgical Gown Package
Next, you need to open the package that holds the surgical gown. The surgical gown comes in a sterile wrap to keep it free from germs. Opening it wrong could make the gown dirty, so be careful.
First, find a clean, flat surface like a table in the operating room. Make sure your hands are still clean from the last step. Pick up the package by the edges. Don’t touch the inside. Look for the label that says how to open it. Most packages have a peel-open tab.
Hold the package away from your body. Pull the tab slowly to open it. The wrap will unfold like a book. Inside, you’ll see the gown folded neatly. Don’t let the wrap touch the floor or anything dirty. If it does, get a new gown.
The surgical gown is usually blue or green and made of a special fabric that blocks fluids. Check if it’s the right size for you. If it’s too small or too big, it won’t protect well. Opening the package right keeps everything sterile. This step is quick, but it’s key to the whole process. Remember, sterile means no germs at all.

Step 3: Pick Up the Surgical Gown
Now that the package is open, it’s time to pick up the gown. You have to do this without touching the outside parts that will be against your body. The goal is to keep the gown clean.
Look inside the open wrap. The reusable or disposable surgical gown is folded with the inside facing up. That means the part that touches your skin is on top. Grab the gown by the neck or shoulders from the inside. Use both hands to lift it straight up.
As you lift, let the gown unfold by itself. Don’t shake it hard, or it might touch something dirty. Hold it high enough so it doesn’t drag on the table or floor. Your arms should be out in front of you.
Check that the gown is oriented right. The opening should be at the back. If it’s backwards, gently turn it without touching the outside. This step needs good hand-eye coordination. If you’re new, ask someone to watch you. Picking up the gown correctly sets up the next steps. It’s like picking up a delicate shirt without wrinkling it, but way more important for safety.
Step 4: Unfold and Orient the Surgical Gown
After picking it up, unfold the surgical gown fully and make sure it’s facing the right way. This step helps you get ready to put it on without twisting or turning later.
Hold the surgical gown by the shoulders with the inside towards you. Let it hang down. Gently shake it a little if needed to unfold the sleeves and bottom. But don’t shake too much, or it might hit the ground.
Look at the gown. The front should have no ties or openings; that’s the sterile side that faces out. The back has an opening where it will tie. Make sure the sleeves are pointing down and not tangled.
If the surgical gown has cuffs, check that they are not inside out. Orient means positioning it so the arm holes are easy to reach. Stand with your feet apart for balance. Hold the gown at chest level.
This step is about being patient. Rushing can cause mistakes, like dropping it. If you drop the gown, it’s no longer sterile, and you need a new one. Practice unfolding with a regular robe at home. Unfolding it right makes putting it on smooth and keeps germs away.
Step 5: Insert Arms Into Sleeves
Now comes the fun part: putting your arms into the sleeves. This is when you start wearing the surgical gown. Do it carefully to avoid touching the outside.
Hold the surgical gown up with both hands at the shoulders. Slide one arm into a sleeve, like putting on a jacket. Push your hand all the way through until it comes out of the cuff. Then do the other arm.
Keep your hands up and away from your body. Don’t let your hands touch the outside of the gown. If the sleeves are long, they might have thumb loops; put your thumbs in them to keep them secure.
Once both arms are in, let the gown fall over your body. The back should be open. Adjust it so it covers you from neck to knees. Make sure it’s comfortable and not too tight.
If you’re alone, you might need to hold the ties, but wait for help. This step feels good because you’re almost dressed. But remember, the gown protects patients from your germs, so stay clean. Common mistake: touching your face or hair. Don’t do that! Keep hands sterile.
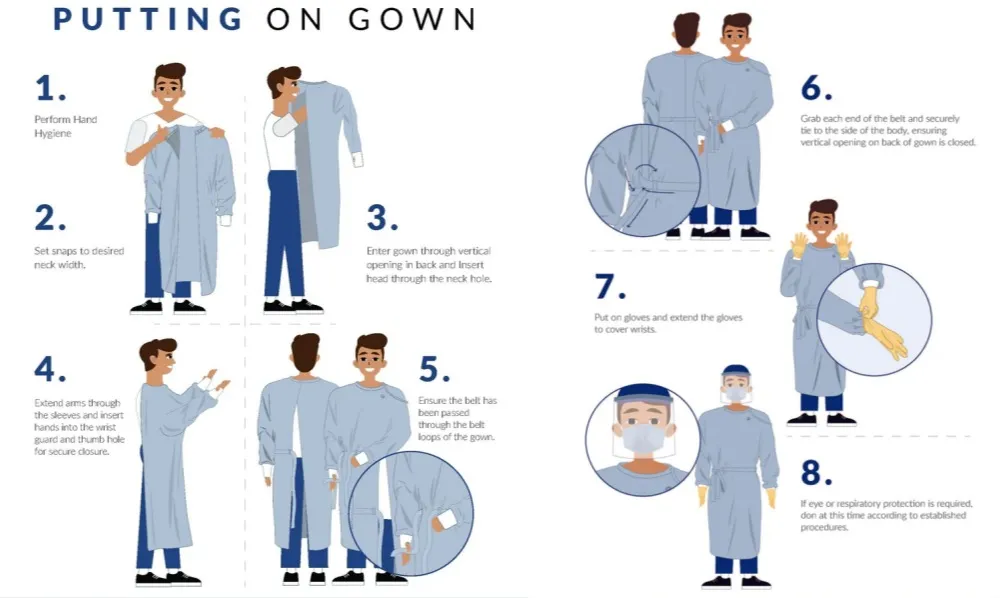
Step 6: Assistant Secures the Surgical Gown (If Applicable)
In many cases, you need help from an assistant to secure the medical surgical gown. This is because you can’t touch the back without risking germs. If you’re alone, skip to the next step, but in surgery, there’s usually a team.
Ask your assistant to stand behind you. They should have clean hands, too. The gown has ties at the neck and sometimes inside.
The assistant grabs the inside ties or Velcro at the neck. They fasten it snugly but not too tightly. You should be able to move your head easily.
Then, they might adjust the back flaps to cover you fully. Don’t turn around; stay facing forward. The assistant uses sterile gloves if needed.
This step shows teamwork in the operating room. It’s applicable means it depends on the situation. If no assistant, use a special method to tie yourself, but it’s harder. Communication is key: tell them if it’s too loose. Securing the right prevents the gown from slipping during work.
Step 7: Tie the Waist Ties Using the Card Transfer Method
The last step is tying the waist ties. This holds the surgical gown closed at the back. Use the card transfer method to keep it sterile. What’s that? It’s a way to pass ties without touching.
The gown has two waist ties: one on each side. One tie is attached to a paper card.
Hold the tie without the card in your hand. Give the card with the other tie to your assistant. They hold the card, not the tie.
Spin around slowly while holding your tie. The assistant pulls the tie off the card without touching it. Now both ties are in place.
The assistant ties them at your side, not the back, to keep the back sterile. Make a bow or knot that’s secure but easy to undo later.
If alone, you can use a wall or something clean to hold the card, but it’s tricky. This method prevents contamination. Tie firmly so the gown stays on during movement.
After tying, you’re ready! Check everything: no gaps, comfortable fit. This whole process takes about 5-10 minutes with practice.

In summary, putting on a surgical gown is a careful routine. Each step builds on the last to ensure safety. By following these, you help prevent infections and do your job well. Always learn from experts and practice. Staying clean saves lives.
Common Mistakes to Avoid When Putting On a Surgical Gown
Wrong surgical gown use causes infection risks. It also leads to protocol failures in the operating room. Recent data shows the most common mistakes. I’ll share practical ways to avoid them.
High-Risk Gowning Errors and Their Impact
- Contact with Non-Sterile Surfaces:
Touching unsterile areas after unfolding the surgical gown is the most frequent breach. Surveys from 2025 show that up to 37% of perioperative staff saw accidental contamination during routine gowning.
Solution: Assign a clear sterile zone. Retrain staff using boundary control drills. - Sleeve and Fabric Dragging:
Sleeves or the lower edge of the gown touch the floor or body too often. This is the second most common error. Nursing forums report this happens with over 25% of novice staff.
Solution: Keep the gown at shoulder height. Insert arms outstretched. Use step-by-step visual cues. - Improper or Rushed Surgical Gown Tying:
Staff skip ties or secure them wrong. This caused up to 10% of gown failures. These failures lead to unsafe gaps.
Solution: Wait for an assistant to tie both the neck and waist ties. I recommend using a two-person check when possible. - Wrong Surgical Gown Size:
A surgical gown that does not fit caused 18% of errors. This increases accidental exposures.
Solution: Check fit during pre-surgery prep. Stock all sizes in advance. - Missed Hand Antisepsis:
Rushing means staff skip hand sanitizing. This drives 12–15% of near-miss events.
Solution: Place visible reminders. Audit hand hygiene often. - Wet or Moist Surgical Gowns:
A damp surgical gown is a direct microbial hazard. Trainees often miss this. Change the gown right away. This is mandatory to prevent infection.
Best Practices for Reducing Gowning Errors
- Designate sterile and unsterile areas in the gowning zone.
- Train and supervise new staff. Correct errors in real time.
- Use stepwise visual guides for proper gowning. This helps with arm insertion.
- Change a gown if it touches non-sterile surfaces or becomes wet.
- I suggest a strict two-person gown-checking protocol for every procedure.
Training and Compliance: Real-World Results
A case study showed that scrub sink reminders reduced non-sterile touches by 41% within two months. I’ve seen that slow, careful gowning steps work best. Combine them with visual tools and direct coaching. This lowers clinical error rates. It improves patient safety in the OR.
Advanced Tips for Effective Surgical Gown Use in Procedures
I recommend practicing surgical gowning technique in simulation labs. This approach cuts errors and improves safety standards. Studies show clear results: staff who complete hands-on simulation training with real-time visual feedback improve their success rate from 36% to over 97% in donning gowns the right way. I suggest using tools like fluorescent tracers or virtual reality simulations. These tools show contamination risks. They help staff learn the correct steps through repeated practice and immediate feedback.
PPE Layering for High-Fluid Exposure Procedures
Operations with heavy blood or irrigation exposure require layering. I advise team members to wear a standard surgical gown combined with a waterproof apron rated at AAMI Level 3 or 4. Double-gloving works well. Pairing gowns with fluid-proof aprons creates a strong, secondary barrier. This extra layer lowers contamination risk. It meets hospital protocols for high-risk cases.
Post-Donning Surgical Gown Integrity Checks
After putting on a surgical gown, I recommend performing these check steps every time:
– Inspect for tears, holes, or punctures around seams and sleeves.
– The gown should cover the torso, neck to knees, and wrists.
– Confirm it is fastened at the neck and waist, without bunching.
– Check sleeves to ensure wrists stay covered when arms are extended.

Sustainable Surgical Gown Options
Sustainable gown choices are on the rise. I like green gowns that use renewable materials or recycled textiles. These gowns can withstand up to 100 laundering and sterilization cycles. They lower waste and long-term costs. Operating rooms that adopt closed-loop recycling and reusable gowns have cut PPE waste by up to 50%. They maintain full protection. Based on my experience, these strategies combine safety, cost-effectiveness, and environmental responsibility. They are key to the next generation of surgical care.
Common Questions About Putting On Surgical Gowns: Expert Answers and Clinical Data
Can You Put On a Surgical Gown Alone?
Yes, you can put on a gown by yourself. Many healthcare workers do this daily. Self-tying systems make solo gowning easy. I recommend mastering the manual techniques if you work alone often.
A 2023 audit shows that 83% of surgical residents completed gowning and gloving without help. Practice regularly. This builds your manual skills and boosts your success rate.
How Long Does It Take to Put On a Surgical Gown?
Most people need 1–2 minutes with some experience. Experienced users average 89 seconds to put on a surgical gown and close all fasteners.
Users rate standard surgical gowns highly for comfort and safety. Volunteers gave them 8.9 out of 10 on average. I find this makes sense—a well-designed gown feels secure and moves with you.
What Should I Do If My Gown Tears During Donning?
Stop right away if you see any tears or holes. Even a small puncture breaks the sterile barrier. This puts patients at risk.
Here’s what I suggest: Stop. Discard the damaged gown. Start over with a new one. This protects the surgical field. Don’t try to continue with a torn gown.
Are There Differences in Donning Techniques for Disposable vs. Reusable Gowns?
Yes, each gown type needs a different approach.
- Disposable surgical gowns: These fit the same way every time. You use them once and throw them away. But they create 4.5–6 lbs of waste per case (up to 7.1 kg CO₂-eq per surgical gown).
- Reusable surgical gowns: These cut PPE waste by up to 80%. That’s better for the environment. But washing them many times can weaken the barrier slightly. I always check them carefully before use.
AAMI Level 2 to 4 surgical gowns work for all standard and high-risk procedures. Pick the level based on how much barrier strength you need.
Addressing Sterility and Glove Donning Pain Points
Glove technique makes a big difference:
Staff-assisted gloving keeps your sleeve cuffs sterile. Self-gloving (open or closed method) leads to 100% contamination around the cuffs. I prefer getting help when possible.
Integrated glove-gown systems cut infection risk. Quick teamwork helps too. This matters most where you need high sterility.
Studies show surgical gowns have the lowest contamination after removal. They average 226 cm² of contamination. Other gowns range from 678–722 cm². Staff also rate surgical gowns best for comfort and safety.
What to Do in Emergencies or Unexpected Situations
If you must remove your surgical gown fast (contamination, allergic reaction), use the immediate doffing protocol:
– Remove the gown step by step
– Alert your support staff
– Secure the sterile area
– Start fresh with a new gown
I also recommend reassessing if you notice any break in procedure. Re-gown to stay safe.
Conclusion
Putting on a surgical gown the right way protects both you and your patients. This guide showed clear steps, common mistakes to avoid, and smart tips that make gowning safer and easier. With practice, anyone can improve their technique and keep the sterile field clean. If you need high-quality custom disposable surgical gowns , feel free to reach out to us for a quick and accurate quote.